🧩 It Started So Innocently
You know how it goes. You have a simple idea. “I just want to know who is calling my MCP tool.” That’s it. Shouldn’t take more than an afternoon, right?
Right?
Turns out it was a great experiment — I followed the MCP spec and Microsoft Foundry documentation to see how far they’d take me, and they took me pretty far. The repo is here: nampacx/MCP-OAuth-Entra
The original motivation was twofold:
- I wanted to know which user is making calls to my MCP tool — not just “some service”, but the actual person behind the request. And beyond just knowing who they are, I wanted a foundation for later accessing Azure resources protected by RBAC on behalf of that user, where permissions are tied to their identity, not a shared service principal
- I wanted to wire this up in Microsoft Foundry, my beloved AI platform, to understand how Foundry manages MCP connections and user context
Simple idea. Long journey. Worth every minute.
🤔 Why Is User Identity in MCP Even a Problem?
If you’ve built a regular REST API before, you’re used to slapping [Authorize] on a controller and calling it done. The MCP world is… a bit more involved.
The challenge is that MCP clients (like Microsoft Foundry agents) first connect to your MCP server without knowing anything about how to authenticate. They don’t have a token. They don’t even know where to go get a token. The whole OAuth dance hasn’t started yet.
So what does your server do when an unauthenticated request comes in? It needs to:
- Return a
401 Unauthorized - Hint the client where to go to get credentials — pointing at your authorization server
This “hint” mechanism is standardized in RFC 9728 — OAuth 2.0 Protected Resource Metadata. Without it, the client is flying blind. With it, the client can discover your Entra ID endpoint automatically and kick off the OAuth flow.
That WWW-Authenticate header is doing a lot of heavy lifting:
HTTP/1.1 401 Unauthorized
WWW-Authenticate: Bearer resource_metadata="https://yourdomain/.well-known/oauth-protected-resource"
The client follows that URL, gets a JSON document pointing at login.microsoftonline.com, fetches a token, and comes back armed and ready.
🏗️ The Architecture
Here’s the full flow once everything is wired up:
Microsoft Foundry Agent (or any MCP client)
  │
  │  POST /mcp  ← no token
  ▼
MCP Server ──► 401  WWW-Authenticate: Bearer resource_metadata=".../.well-known/oauth-protected-resource"
  │
  │  GET /.well-known/oauth-protected-resource          (RFC 9728)
  ▼  { "resource": "api://<client-id>",
  │    "authorization_servers": ["https://login.microsoftonline.com/<tenant-id>/v2.0"] }
  │
  │  (client authenticates with Entra ID and gets a token for the resource)
  │
  │  POST /mcp  Authorization: Bearer <Entra ID token>
  ▼
MCP Server validates JWT ──► executes tool ──► returns result 🎉
The server exposes two MCP tools:
get_user— returns all claims from the user’s JWT token as key-value pairs. Great for sanity-checking that the right identity is flowing through.get_graph_profile— goes further and fetches the user’s full Microsoft Graph profile using the OAuth 2.0 On-Behalf-Of (OBO) flow.
⚙️ The Code: Setting Up JWT Auth + the PRM Endpoint
The heart of it is in Program.cs. Standard JWT Bearer setup, but with a custom OnChallenge handler that emits the RFC 9728 discovery URL instead of a generic 401:
builder.Services
    .AddAuthentication(JwtBearerDefaults.AuthenticationScheme)
    .AddJwtBearer(options =>
    {
        options.Authority = $"{instance}/{tenantId}/v2.0";
        options.TokenValidationParameters = new TokenValidationParameters
        {
            ValidAudiences = [$"api://{clientId}", clientId],
            ValidIssuers = [
                $"{instance}/{tenantId}/v2.0",
                $"https://sts.windows.net/{tenantId}/"
            ],
        };

        options.Events = new JwtBearerEvents
        {
            OnChallenge = async context =>
            {
                context.HandleResponse();
                var prmUrl = $"{req.Scheme}://{req.Host}/.well-known/oauth-protected-resource";
                context.Response.StatusCode = 401;
                context.Response.Headers.WWWAuthenticate = $"Bearer resource_metadata=\"{prmUrl}\"";
                await context.Response.WriteAsync(
                    """{"error":"unauthorized","error_description":"A valid Bearer token is required."}""");
            }
        };
    });
And then the RFC 9728 discovery document itself — just a minimal JSON endpoint:
app.MapGet("/.well-known/oauth-protected-resource", () => Results.Ok(new
{
    resource                 = $"api://{clientId}",
    authorization_servers    = new[] { $"{instance}/{tenantId}/v2.0" },
    bearer_methods_supported = new[] { "header" },
    scopes_supported         = new[] { $"api://{clientId}/user_impersonation" }
}));

app.MapMcp("/mcp").RequireAuthorization();
That’s the magic combo. The RequireAuthorization() forces the 401 on unauthenticated requests, and the custom challenge handler sends the client to the discovery document.
🪪 Reading the User Identity: get_user
Once the token is validated, reading the user is trivially simple — just pull claims from the ClaimsPrincipal:
[McpServerTool(Name = "get_user")]
[Description("Returns all non-null claims present in the authenticated user's JWT token.")]
public Dictionary<string, string> GetUser()
{
    var principal = httpContextAccessor.HttpContext?.User
        ?? throw new InvalidOperationException("No HTTP context available.");

    return principal.Claims
        .Where(c => !string.IsNullOrEmpty(c.Value))
        .GroupBy(c => c.Type)
        .ToDictionary(
            g => g.Key,
            g => string.Join(", ", g.Select(c => c.Value))
        );
}
You get back something like:
{
  "preferred_username": "michael@contoso.com",
  "given_name": "Michael",
  "family_name": "Kokonowskyj",
  "name": "Michael Kokonowskyj",
  "oid": "...",
  "tid": "..."
}
Heads up for personal Microsoft accounts (like live.com or outlook.com):
given_nameandfamily_namewon’t be populated even if you configured optional claims correctly. Onlynamecomes through. Burned me during testing. You’re welcome.
🔄 Going Deeper: get_graph_profile + the OBO Flow
The get_user tool works great for JWT claims. But what if you need richer profile data — job title, department, office location — stuff that’s in Microsoft Graph but not in the token itself?
This is where the OAuth 2.0 On-Behalf-Of (OBO) flow comes in. The idea: your server exchanges the user’s incoming token for a new token scoped specifically for Microsoft Graph, then calls Graph on behalf of that user.
public async Task<User> GetProfileAsync()
{
    var userToken = http.HttpContext?.Request.Headers.Authorization.ToString()
        ["Bearer ".Length..];  // strip "Bearer " prefix

    // Exchange the incoming token for a Graph-scoped token via OBO
    var credential  = new OnBehalfOfCredential(tenantId, clientId, clientSecret, userToken);
    var graphClient = new GraphServiceClient(credential);

    return await graphClient.Me.GetAsync();
}
The OnBehalfOfCredential from Azure.Identity handles all the OAuth complexity of the OBO exchange. The client secret (stored safely in Key Vault, never in app settings) is the key that proves your server is authorized to perform this exchange.
The result is the user’s full Graph profile:
{
  "displayName": "Michael Kokonowskyj",
  "userPrincipalName": "michael@contoso.com",
  "jobTitle": "Cloud Architect",
  "department": "Platform",
  "officeLocation": "Amsterdam"
}
🤖 The Microsoft Foundry Piece: Identity Passthrough
Here’s the part that really motivated this whole adventure. Microsoft Foundry supports a feature called OAuth Identity Passthrough for MCP connections. Instead of your Foundry agent calling downstream services with its own managed identity, it forwards the signed-in user’s Entra ID token.
This means the MCP server sees the actual human user, not some generic service principal. For scenarios where user context matters — personalized responses, audit logging, per-user data access — this is huge.
Setting it up requires your MCP server to:
- Be a proper OAuth resource server (✅ done — JWT validation)
- Advertise itself via RFC 9728 so Foundry can discover the auth server automatically (✅ done — the
/.well-known/oauth-protected-resourceendpoint)
That’s it. Foundry does the rest. It fetches the discovery doc, gets a token from Entra ID, and passes it along with every MCP tool call. No shared secrets, no service account tokens floating around — pure delegated user identity.
🚀 Deploying the Resources
The repo has a clean three-script deployment pipeline. No manual portal clicking — just PowerShell and Bicep.
Step 1: Provision (Entra ID + Azure infrastructure)
The provisioning script is idempotent — safe to run multiple times if something goes wrong halfway through. It handles all the chicken-and-egg dependencies between the app registration and the infrastructure in the right order:
- Creates/updates the Entra ID app registration with optional claims (
given_name,family_name,upn) - Configures Graph API permissions and grants tenant-wide admin consent automatically (if you have the rights)
- Exposes the
user_impersonationdelegated scope - Pre-authorizes the Azure CLI so you can test locally without extra OAuth setup
- Deploys App Service + Key Vault via Azure Verified Modules (AVM) Bicep
- Generates a 1-year client secret and stores it in Key Vault — never printed to the console
# Basic provision
.\deploy\01-Provision.ps1 -ResourceGroup 'rg-mcp-oauth-entra' -Location 'westeurope'

# Include Microsoft Foundry (Foundry account, project, GPT model in swedencentral)
.\deploy\01-Provision.ps1 -ResourceGroup 'rg-mcp-oauth-entra' -Location 'westeurope' -DeployFoundry
At the end the script prints your TenantId, ClientId, Key Vault name, and the exact dotnet user-secrets commands to load everything for local dev:
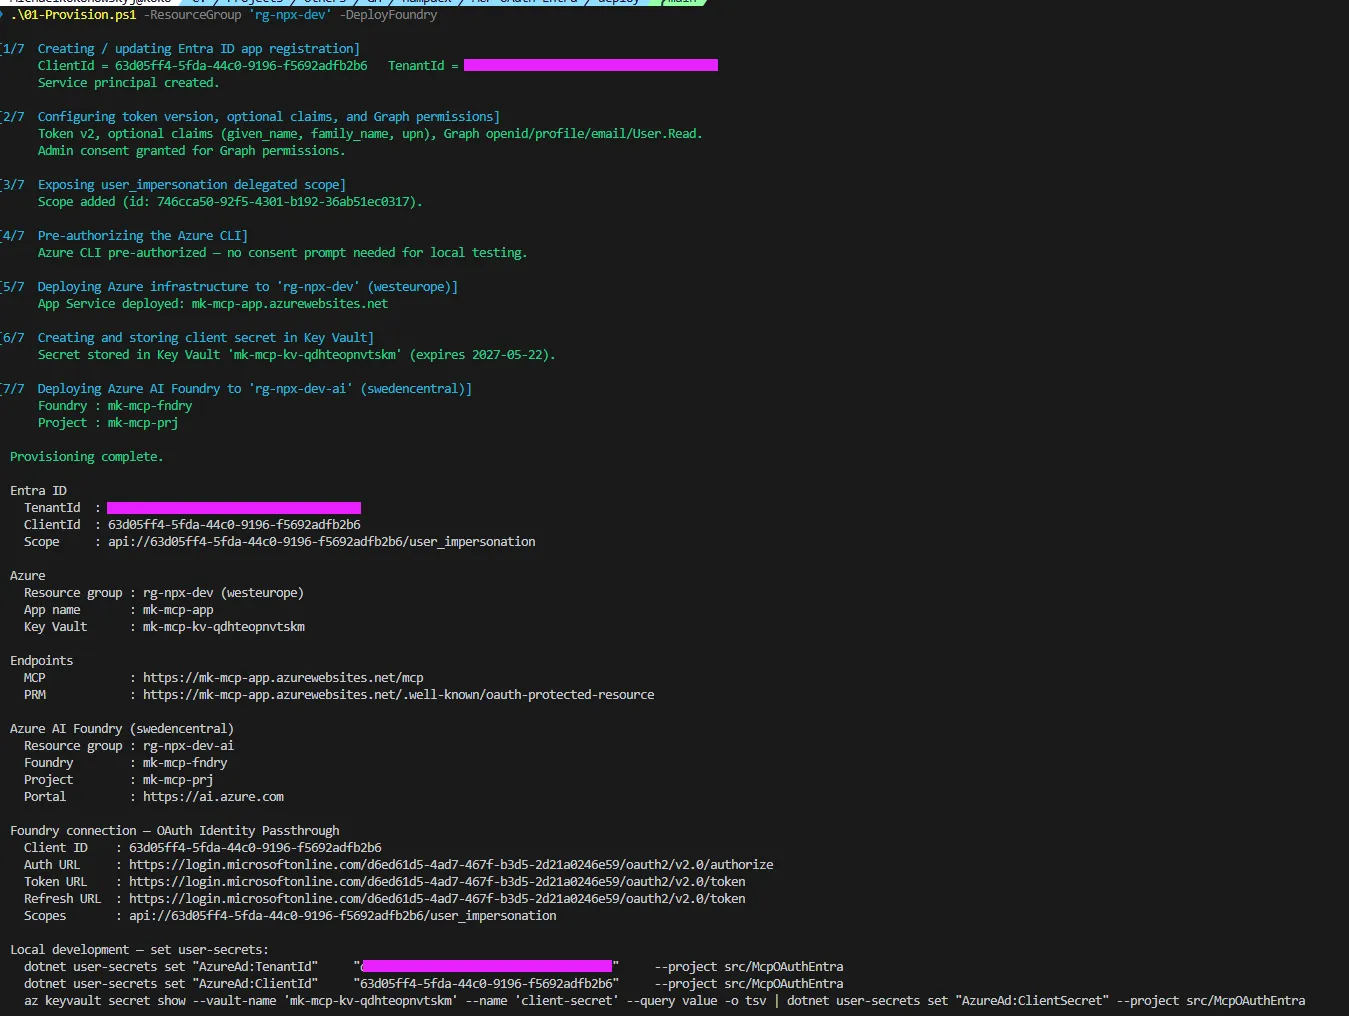
Step 2: Deploy the application
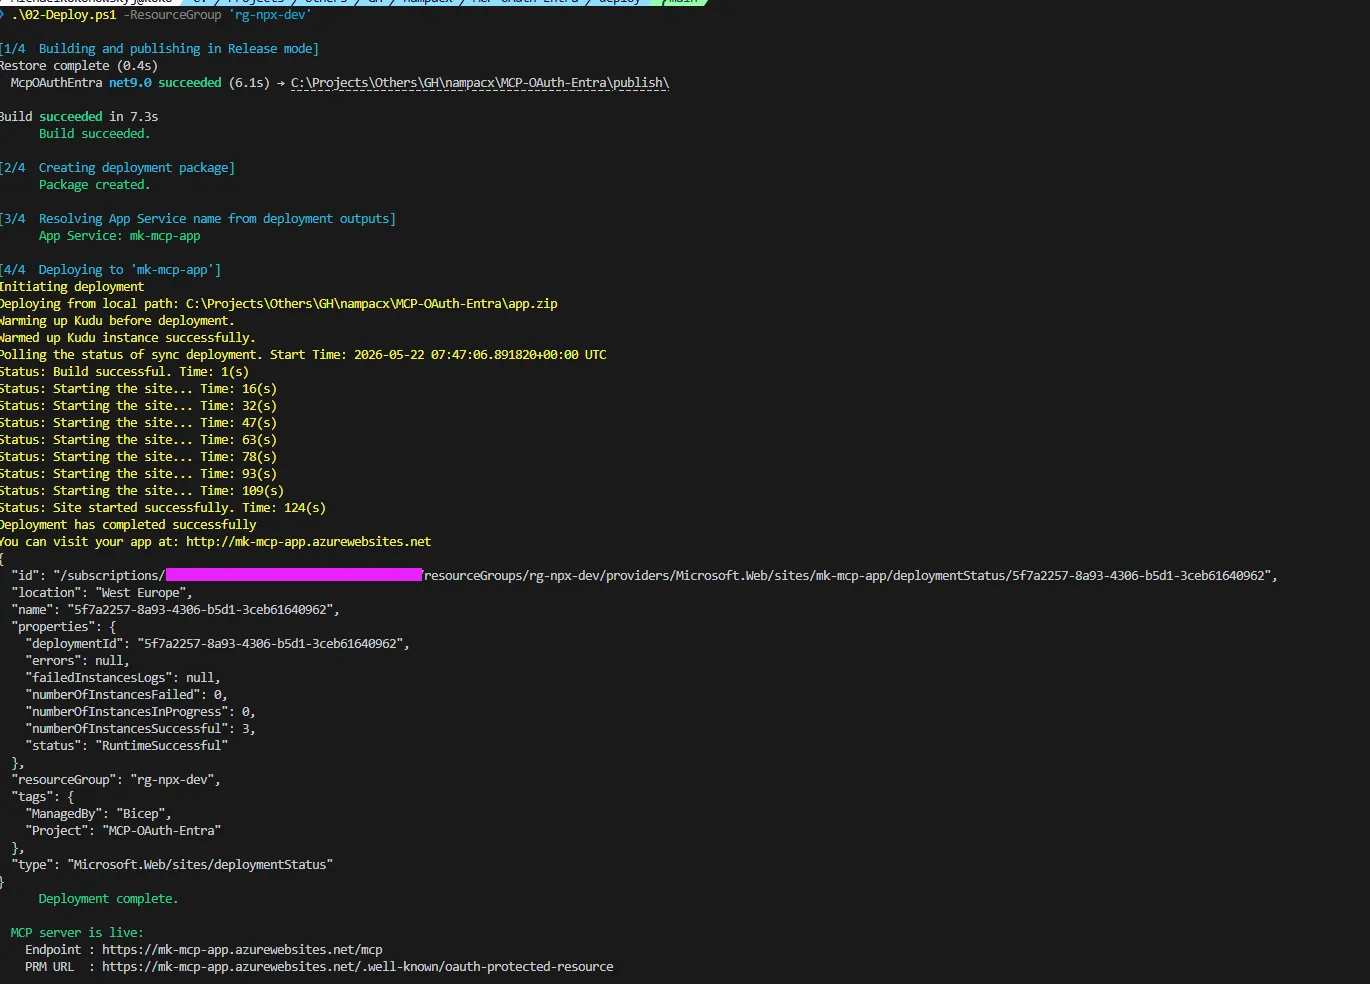
Once the infrastructure is up, one more script builds and publishes the .NET app to the App Service:
.\deploy\02-Deploy.ps1 -ResourceGroup 'rg-mcp-oauth-entra'In production the App Service reads AzureAd:ClientSecret via a Key Vault reference resolved through its system-assigned managed identity. No secret in app settings, no secret in environment variables — the way it should be.
Cleanup
When you’re done experimenting, 03-Cleanup.ps1 tears everything down in the right order (Foundry resource group → purge Cognitive Services → main resource group → purge Key Vault → optional Entra app deletion):
.\deploy\03-Cleanup.ps1 -ResourceGroup 'rg-mcp-oauth-entra' -DeleteEntraApp🤖 Wiring the MCP Server into a Foundry Agent
With the app deployed and your TenantId, ClientId, and App Service URL in hand from the provision output, you have everything you need. Open your Foundry project and add a new tool to your agent:
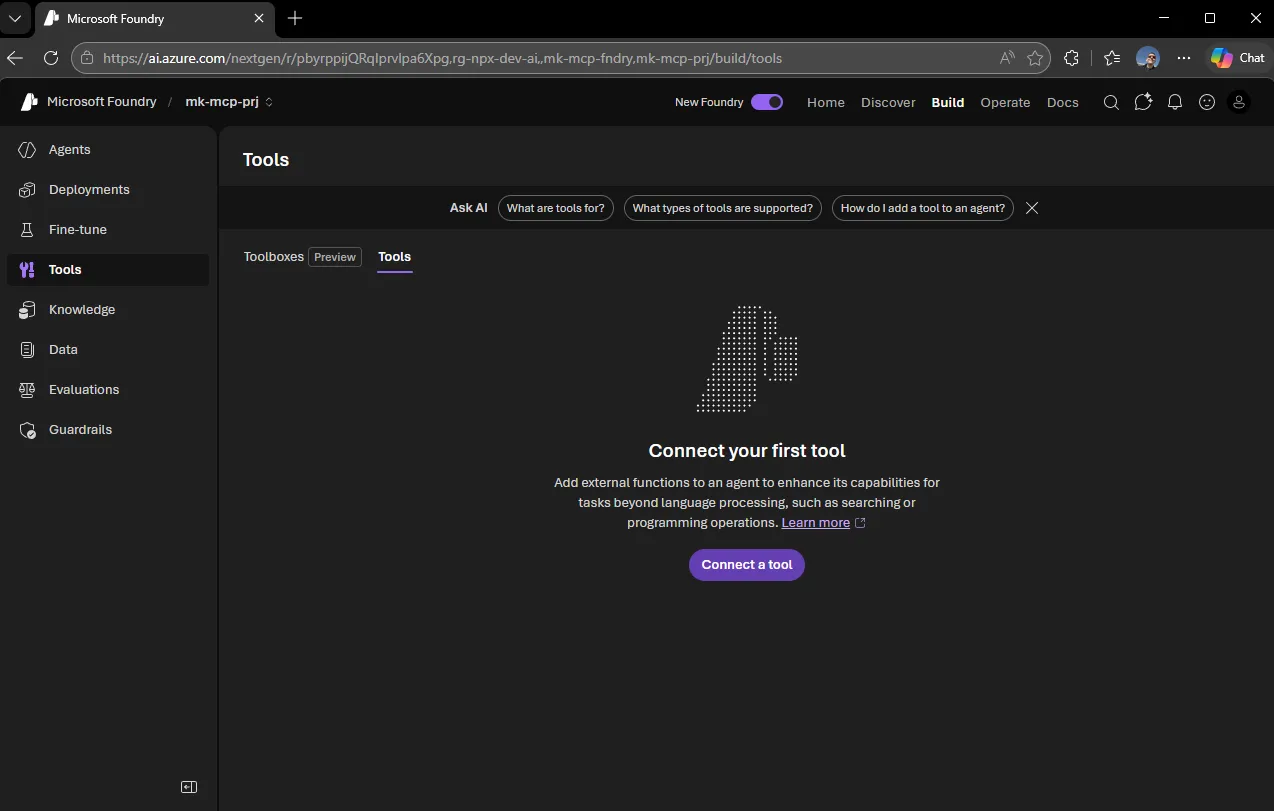
Choose “Custom MCP” as the tool type:
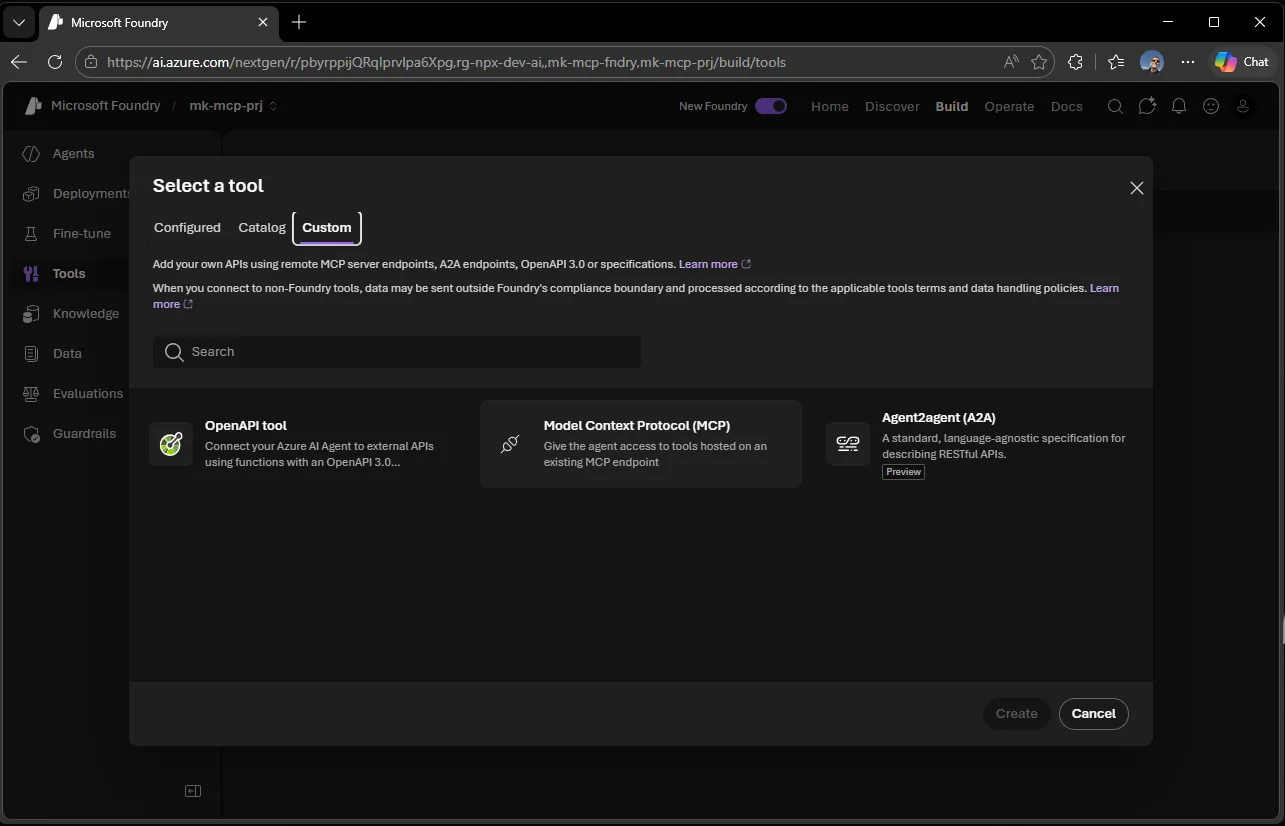
Enter the URL of your deployed MCP server (https://<your-app>.azurewebsites.net/mcp). Foundry probes the endpoint, gets the 401 back with the resource_metadata header, and follows it to the /.well-known/oauth-protected-resource document to learn which authorization server to use — so far so good.
But knowing where to get a token is not the same as actually having one. To complete the OAuth flow on behalf of a user, Foundry also needs a registered client (your Entra ID app registration’s ClientId), a matching client secret, and the correct redirect URI. That combination is what allows Foundry to broker the sign-in and exchange the authorization code for a token. Without it, discovery succeeds but the actual token acquisition fails.
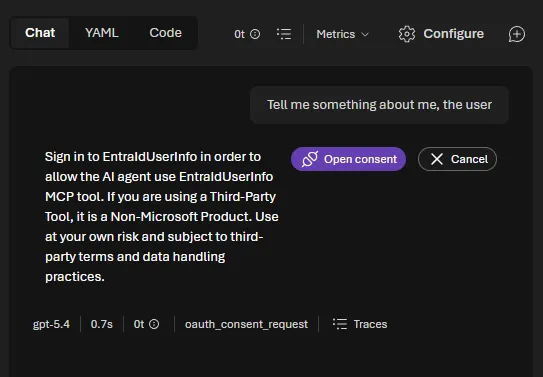
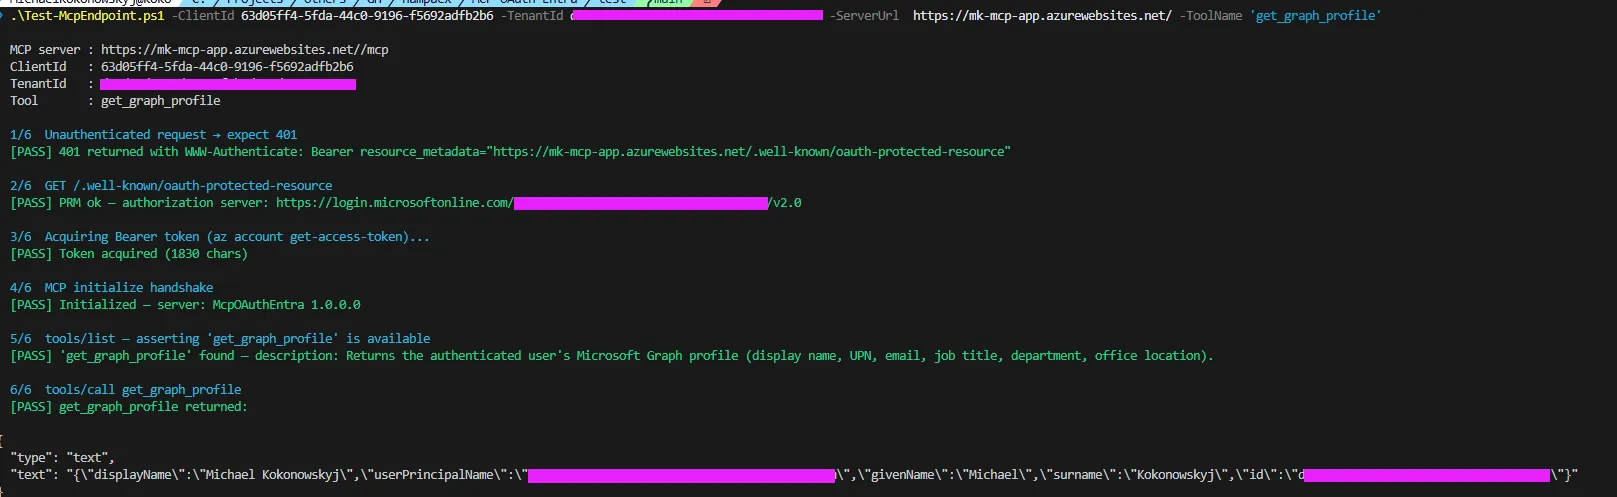
In practice this means the first time a user triggers a tool, Foundry will prompt them to sign in. You can verify the whole chain before wiring anything into Foundry using Test-McpEndpoint.ps1 — it walks through exactly these steps: unauthenticated probe → discovery doc → token acquisition → tool call, so you can confirm each piece is working in isolation.
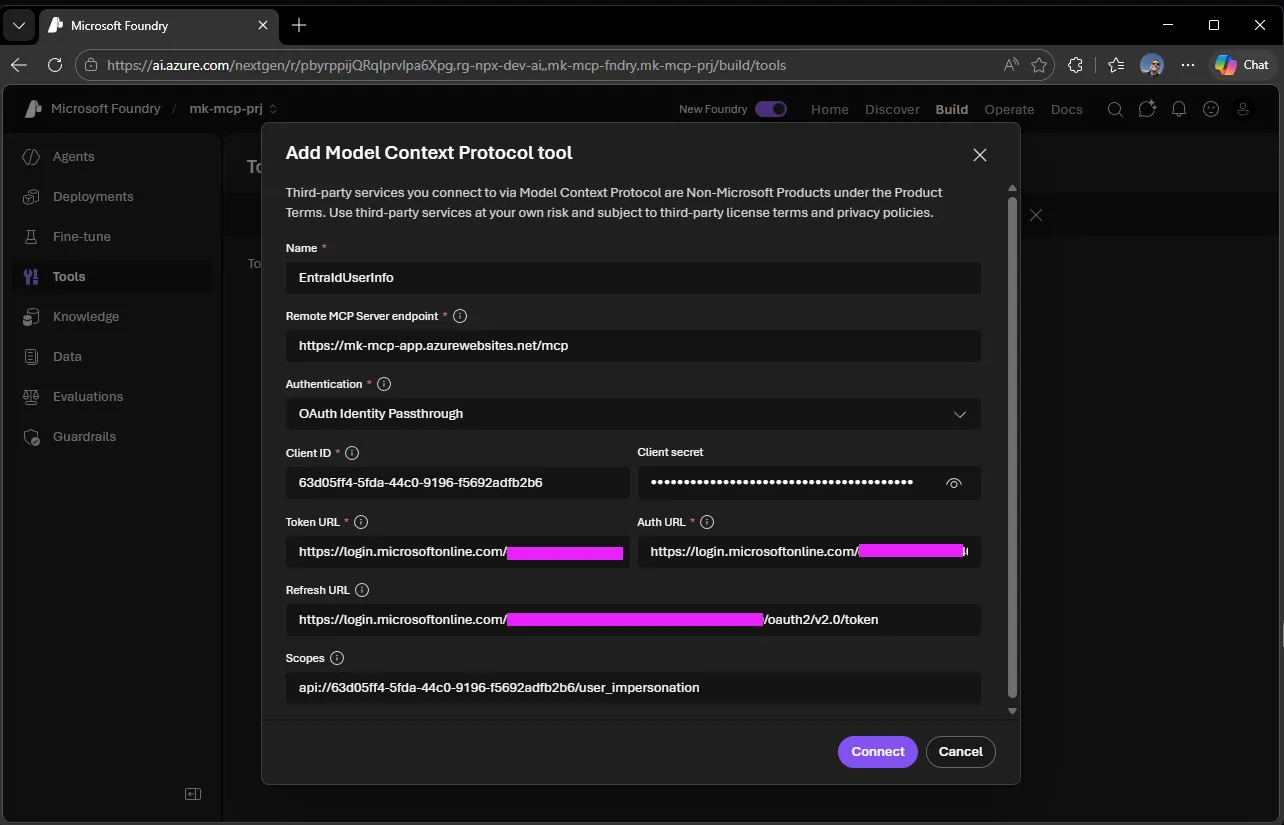
Foundry needs a redirect URI registered in your Entra ID app to complete the OAuth flow on behalf of the user. You’ll see the redirect URI it requires — copy it:
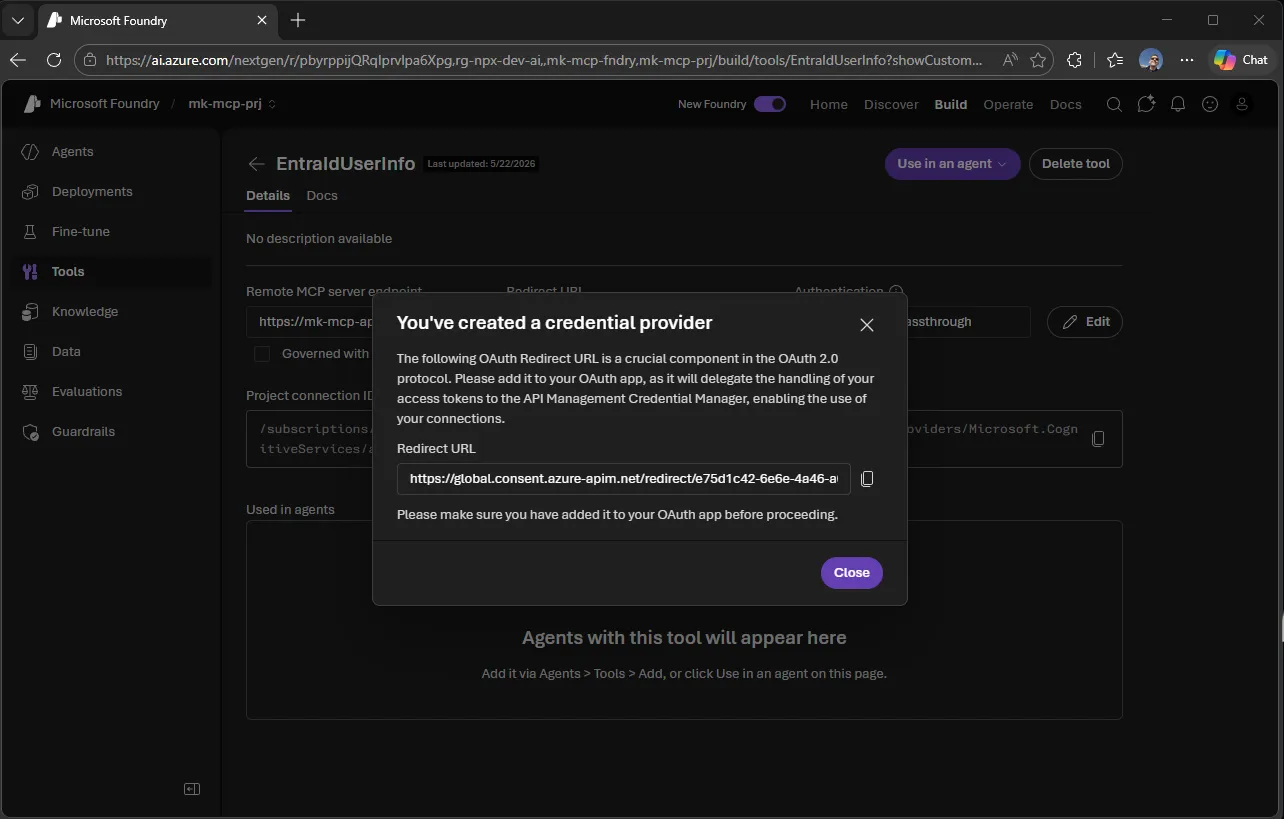
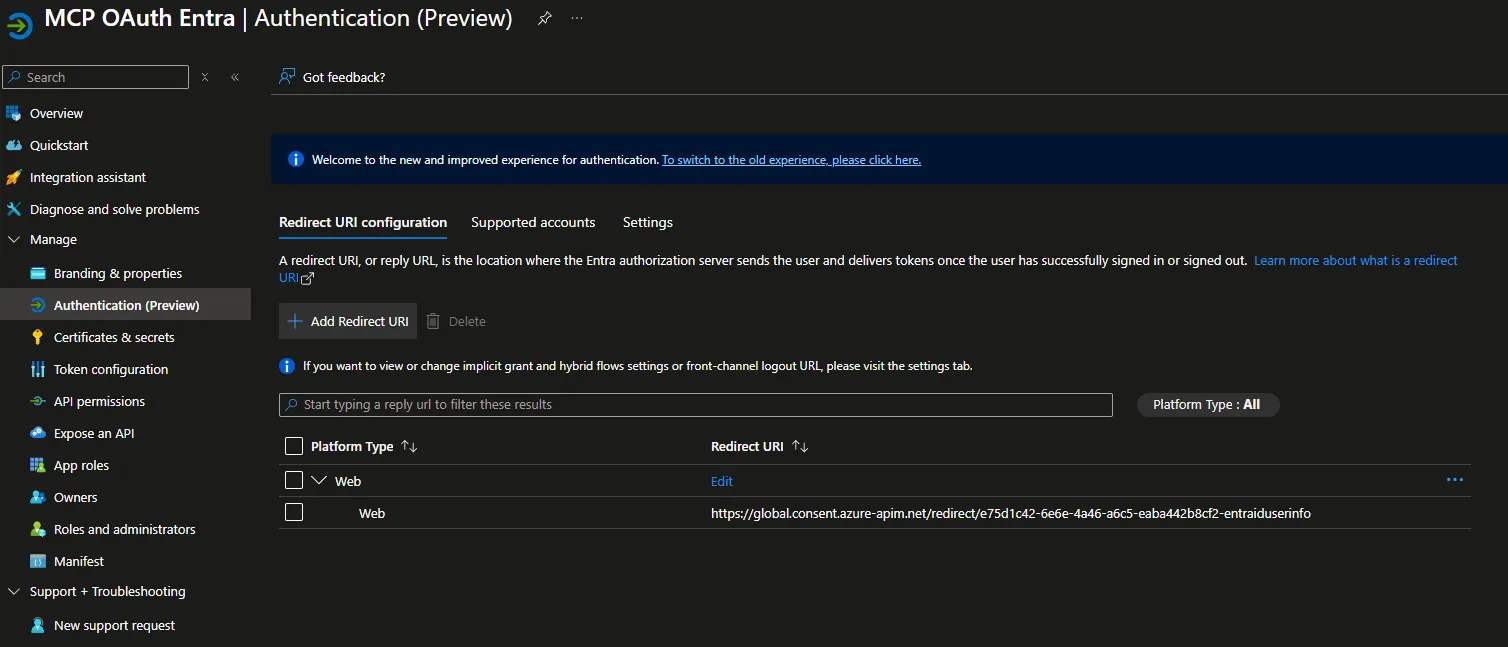
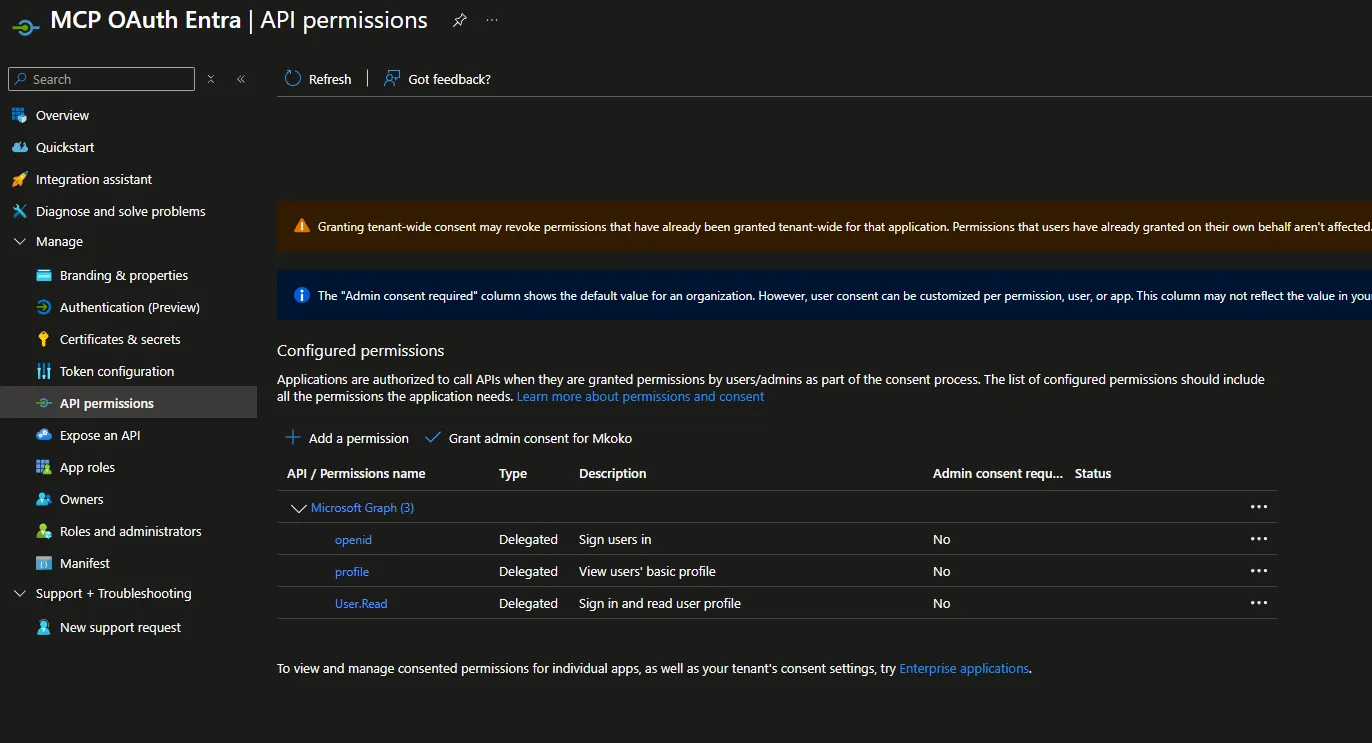
Paste that redirect URI into your Entra ID app registration under Authentication → Redirect URIs:
Once the redirect URI is in place, your agent is ready to go. Open the agent’s test chat and run it:
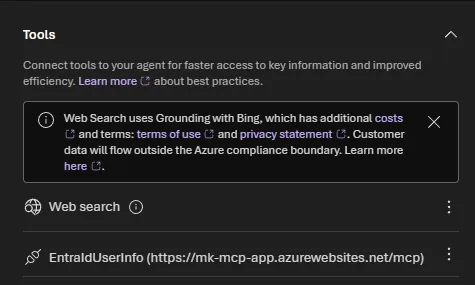
In the agent’s tool panel you can see the MCP connection is registered — though Foundry shows the connection itself, not the individual tools behind it (get_user, get_graph_profile are there, but they’re not listed separately at this level):
The first time a user invokes a tool that requires their identity, Foundry prompts them to sign in:
After sign-in, the user is shown a consent screen for the tool — and then the result comes back with the real user’s identity flowing through end-to-end:
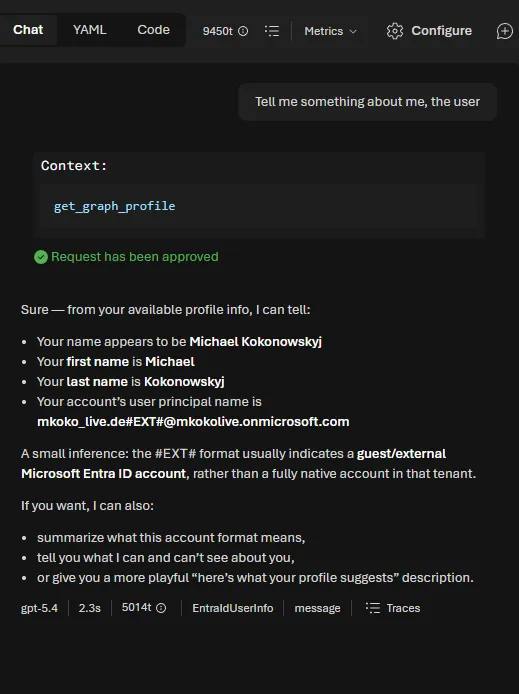
That final screenshot is the payoff. The get_graph_profile tool returned the user’s full Microsoft Graph profile — fetched on behalf of the actual signed-in user, not a service principal, not a shared identity — the real person behind the browser.
🧪 Testing It End-to-End
The repo includes a PowerShell test script that validates the whole flow in 6 steps:
| Step | What’s verified |
|---|---|
| 1 | Unauthenticated POST returns 401 with the resource_metadata header |
| 2 | /.well-known/oauth-protected-resource returns valid JSON |
| 3 | az account get-access-token returns a Bearer token |
| 4 | MCP initialize handshake succeeds |
| 5 | tools/list includes the requested tool |
| 6 | tools/call returns the actual result |
# Test locally
.\test\Test-McpEndpoint.ps1 -ClientId '<client-id>' -TenantId '<tenant-id>'

# Test against deployed App Service with the graph profile tool
.\test\Test-McpEndpoint.ps1 -ClientId '<client-id>' -TenantId '<tenant-id>' `
    -ServerUrl 'https://<app>.azurewebsites.net' -ToolName 'get_graph_profile'
Step 1 failing (no 401 or wrong headers) means your auth middleware isn’t wired right. Step 3 failing means your Entra app registration is off. Step 6 failing on get_graph_profile usually means admin consent wasn’t granted. Each step isolates a specific part of the chain — really useful for debugging.
💡 What I Learned (the Hard Way)
A few things that took longer to figure out than I’d like to admit:
RFC 9728 is the missing piece. Without the Protected Resource Metadata endpoint, MCP clients have no automatic way to discover your authorization server. The spec is short and readable — worth a skim before building anything OAuth-protected in the MCP world.
v1 and v2 token issuers. Entra ID can issue tokens from both sts.windows.net (v1) and login.microsoftonline.com (v2). If you only validate one issuer, you’ll get mysterious 401s depending on how the client acquired the token. Both need to be in ValidIssuers.
Admin consent is not optional for OBO. The get_graph_profile tool requires the app to have Graph permissions with tenant-wide admin consent. If you skip this, you get AADSTS65001 at runtime and spend an embarrassing amount of time wondering what’s wrong.
Personal Microsoft accounts are special. The optional claims (given_name, family_name) that work fine with work/school accounts silently don’t populate for personal accounts. Plan your token parsing accordingly.
🎯 Wrapping Up
What started as “I just want to know who the user is” turned into a thorough education on OAuth resource servers, RFC 9728 discovery, the OBO flow, and Microsoft Foundry’s identity passthrough model. Not what I planned for the day, but honestly one of the more satisfying rabbit holes I’ve gone down recently.
The patterns here — JWT validation, PRM discovery, OBO exchange, Key Vault for secrets — are reusable for any MCP server that needs real user identity rather than service-level access. And if you’re building on Microsoft Foundry, identity passthrough means you can carry that user context all the way through your agent’s tool calls without any extra plumbing.
The full repo with deployment scripts, IaC, and the test harness is at nampacx/MCP-OAuth-Entra. Clone it, provision it with one PowerShell command, and see whose identity comes out the other end. 🎉